Overview
Linux scanning and patching by LanGuard are implemented with the help of SSH scripting. This article describes the processes involved and troubleshooting guidelines.
Introduction
GFI LanGuard is mainly focused to function and operate in Microsoft Windows networks. However, LanGuard allows scanning and patching for Linux computers that meet the requirements.
Linux scanning and patching are based on SSH scripting. The scripts communicate with the Linux machines' built-in Package Manager (i.e. like Windows Update) which does the actual scanning and patching. No definitions are needed and no agent or services are installed on the client computer, everything is handled by the Package Manager (yum, apt, zypper) on each Linux machine.
Description
Scanning Process
- LanGuard tries to communicate with the Linux computer over SMB to determine an SMB hostname if Samba is enabled.
- Regardless of SMB status, LanGuard copies all the .sh scripts to the user’s home folder.
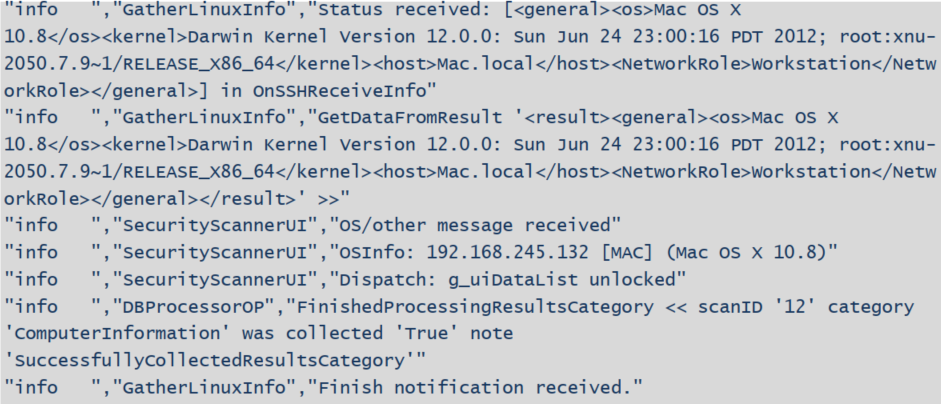
- The scripts will determine what OS is running and get the computer’s installed software and OS updates using the Package Manager.
- Information from the Package Manager is sent back to the LanGuard server.

Common scripts used are:
- The script for patch scanning - %Data%\GFI\LanGuard 12\Scripts\linuxpatchscan.sh
- The script for determining installed packages - %Data%\GFI\LanGuard 12\Scripts\packagescan.sh
Note: Linux scanning results are more likely to produce false positives (or missing information) because Linux is by definition open source and offers a very unrestricted set of conditions when it comes to software design and implementation.
Patch Deployment Process
- LanGuard opens a new SSH session to the target computer.
- The deployment script with a name like <number>_<target computer name>_deploy.sh. is generated on the fly according to the patches list. It contains a sequence of Bash and Python instructions for the Package Manager on what patches to download and install.
- LanGuard transfers and executes the script over SSH.
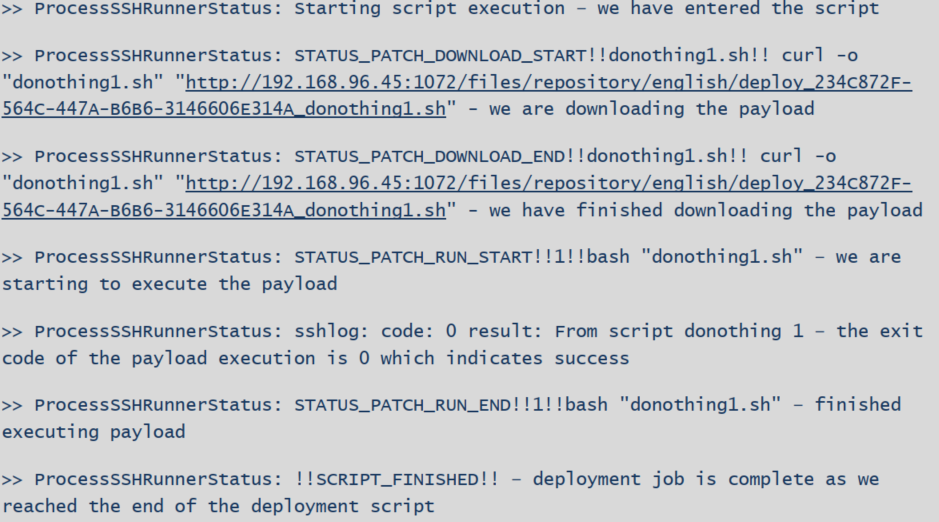
- The script sends back status messages via the established SSH connection using ECHO calls.
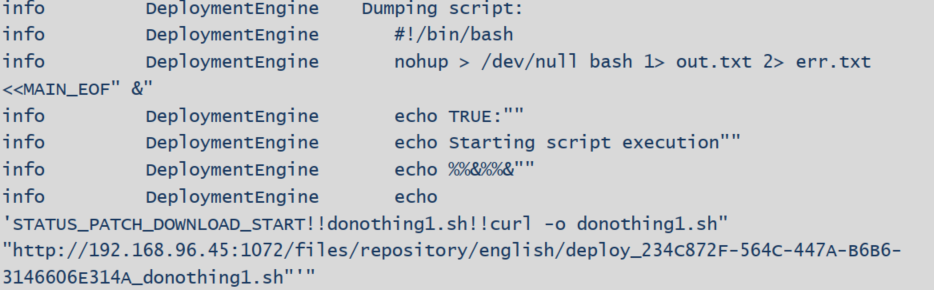
Note: The content of the remediation script is dumped into debug logs when Debug is enabled so that we can see what was executed.
SSH Workflow to Run a Script File
Below is the SSH Workflow for scanning and patching:
1. LanGuard establishes an SSH connection.
2. TSSHManager checks the availability of using SUDO by sending “sudo -k which sh”. If remote PC requests [sudo] password, then TSSHManager provides it. The successful result of this command is a response “/bin/sh”.
3. TSFTPManager creates a temporary folder “.gfi_temp” on a remote PC.
Note: Although its contents are deleted after successful can, the folder itself doesn't get deleted. GFIL-15043 was raised to clarify whether it is a defect or it is intentionally designed.
4. The script is converted to the Unix line ends.
5. The script is renamed to a unique name.
6. TSFTPManager copies prepared script to the created temporary folder on the remote PC.
7. TSSHFolderManager sends “cd ~ ; sudo chmod 777 .gfi_temp ; cd .gfi_temp” to set required rights on the temporary folder and change work folder to the temporary folder. The successful result is a response containing a temporary folder name.
8. TSSHScriptFileRunner runs copied scripts with command "./{script name} parameters".
9. Script files contain different markers like: >>STARTED\?>>, <<FINISHED\?<<, TRUE:,!!SCRIPT_FINISHED!!. Depending on these markers Languard parses received data.
10. When !!SCRIPT_FINISHED!! marker is received, then Languard stops processing script data.
11. TSFTPManager removes the script file.
12. TSSHManager closes the SSH connection.
Scripts are located in the %Data%\GFI\LanGuard 12\Scripts.
Logging and Troubleshooting
Troubleshooting operations and actual SSH workflow issues, after the requirements verification, is based on the debugging information from logs, located in %Data%\GFI\LanGuard 12\DebugLogs\ folder. Relevant log names for LanGuard 12.5 (numbers would be based on the version) are:
- lanss_v125_sshrunner.csv - SSH runner
- lanss_v125_patchdeployment.csv - patch deployment
- lanss_v125_securityscanner.csv - scanning
Note: We do not leave any logs on the target Linux machine.
Most of the time Linux administration knowledge, shell scripts understanding, and the ability to analyze logs are all that is needed to pinpoint possible issues.
For example, procscan.sh script requires expect, gdb, and diff packages to be present. You can check them with which command and install using package manager, for example: yum install diff. If needed, refer to the Basic Linux Troubleshooting Commands.
Another general understanding case can be LanGuard not reporting a service present on a target machine. This can happen when some custom/modified application runs a service in the background that does not reply with any status message when queried by LanGuard – hence the status of the service will not be evaluated.
Follow the process flow, pay attention to the markers and status messages. Important milestones are:
DeLogsReader.exe is recommended for quickly locating warnings and errors if the logs are big. Yet do not forget to verify findings looking through raw logs, since some errors can be ignored by analyzing log lines after them. For example:
- Python3: command not found error usually does not affect scan result because script files check available Python version.
- Directory is not created. Comment is "Failure". Error code is 4. error means that the .gfi_temp directory already exists. Usually, it was not removed after the previous failure.

<supportagent>
Ticket Examples
Below are some examples of tickets were agents are using the logs analysis results to identify issues and probable root causes:
- https://central-supportdesk.zendesk.com/agent/tickets/2362745
- https://central-supportdesk.zendesk.com/agent/tickets/2373510
- https://central-supportdesk.zendesk.com/agent/tickets/903671
</supportagent>
Priyanka Bhotika
Comments