Overview
GFI LanGuard allows users to import and export the configuration settings to be able to recover the configuration in case of data loss and to reuse them during the migration or an upgrade to a new version. This article describes the required steps to export and import the GFI LanGuard configuration.
Solution
The Import and Export Configurations Wizard is a GFI LanGuard feature that enables you to import and export settings. This feature is useful when you want to retain configuration settings from an older version of GFI LanGuard and reuse them in a new version, as well as to backup the configuration to be able to recover in case of data loss.
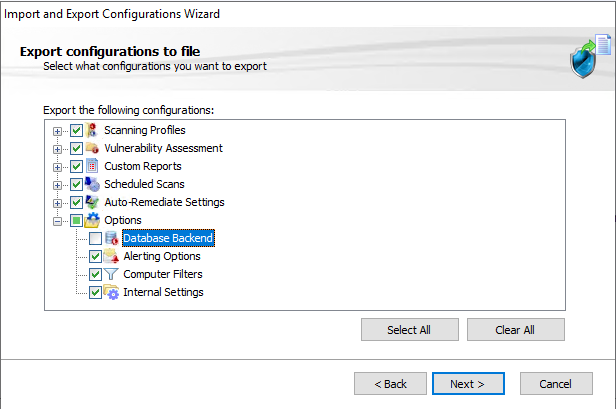
- Scanning Profiles
- Vulnerability Assessment
- Ports (TCP/UDP)
- Results Filtering Reports (Custom Reports, Scheduled Reports)
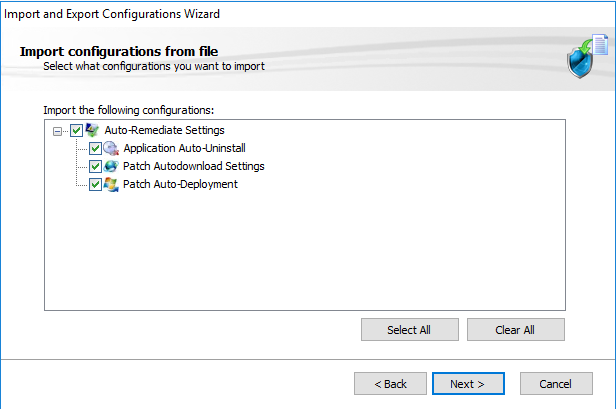
- Auto-Remediate Settings (Application Auto-Uninstall and Patch Settings)
- Options
- Alerting Options
- Computer Filters
- Internal Settings
The following sections provide information about:
- Exporting Configuration To a File
- Importing Configuration From a File
- Importing Configuration From Another Instance of GFI LanGuard
Note: If you want to export/import only the scanning profiles and vulnerability definitions it is possible to use Impex command line tool. For example, to set up an automated scanning profiles backup.
Exporting Configuration To a File
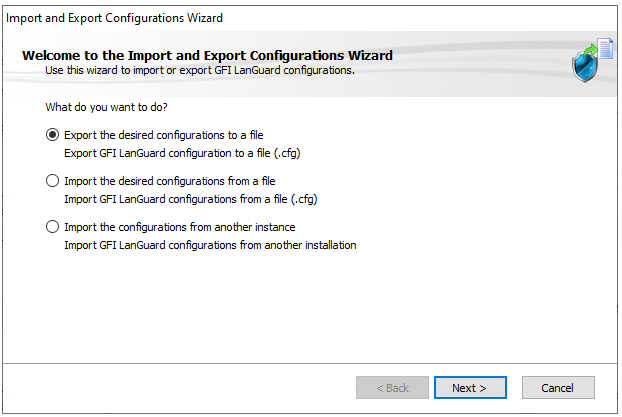
- Open the GFI LanGuard console and go to File > Import and Export Configuration.
- Select the Export the Desired Configurations to File option and click Next.
- Select the location to save the file and click Next.
- Wait for the configuration tree to load, select the configuration options to export, and DO NOT select the Database Backend option, If unchecking Database Backend disables Scheduled Reports too, then export the settings with Database Backend enabled, but DO NOT import the Database Backend
- Click Next
- Once complete, a .cfg file is created in the location specified.
- Click OK to finish.
Note: Remember to make a backup of the exported configurations file.
Importing Configuration From a File
- Open the GFI LanGuard console and go to File > Import and Export Configuration.
- Select the Import the Desired Configurations to File option and click Next.
- Specify the path from where to load configuration, and click Next.
-
Wait for the configuration tree to load, select the configurations to import, and click Next.
Note: Only actually exported configurations will be present in the list.
- Confirm the override dialog box by clicking Yes or No as required.
- A notify dialog will confirm that exporting is completed. Click OK to finish.
Importing Configuration From Another Instance of GFI LanGuard
- Open the GFI LanGuard console and go to File > Import and Export Configuration.
- Select the Import the configuration from another instance and click Next.
- Click Browse to select the GFI LanGuard installation folder on the machine from where you want to import the configurations. The default location is listed in the table below, where XX is the LanGuard version:
Operating Systems Path Windows® XP Professional (SP2 or higher) C:\Documents and Settings\All Users\Application Data\GFI\LanGuard XXWindows® Server 2003 Standard/Enterprise C:\Documents and Settings\All Users\Application Data\GFI\LanGuard XXWindows® Vista Business/Enterprise/Ultimate and later C:\Program Files\GFI\LanGuard XXWindows® Server 2008 (including R2) Standard/Enterprise and later C:\Program Files\GFI\LanGuard XX - Select which settings you want to import and click Next.
- While importing, GFI LanGuard will ask you whether you want to override or keep your settings. Select one of the following options:
Operating Systems Path Yes Override the current setting with the imported setting. No Keep the current setting and ignore the imported setting. Auto Rename Rename the imported settings and keep the current settings. - Click OK when the import is ready.
Priyanka Bhotika
Comments