Overview
This article provides information about the Scheduled Scans usage and describes in detail how to create a Scheduled Scan, edit it, and configure its properties.
Solution
A Scheduled scan is a network audit that is scheduled to run automatically on a specific date/time and at a particular frequency. Such scans can be set to execute once or periodically, and they can be monitored by navigating to Activity Monitor > Security Scans.
It is recommended to use Scheduled scans when GFI LanGuard Agents are not deployed on the target computers to:
- automatically perform periodical and regular network vulnerability scans using the same Scanning Profiles and parameters
- automatically trigger scans after office hours and generate alerts and auto–distribution of scan results via email
- automatically trigger auto-remediation options, e.g., Auto-download, deploy missing updates, etc.
The following sections contain information regarding creating, editing, and configuring scheduled scans properties.
Creating a Scheduled Scan
- Launch GFI LanGuard.
- Click on Configuration > Scheduled Scans.
- Under Common Tasks, choose New scheduled scan.
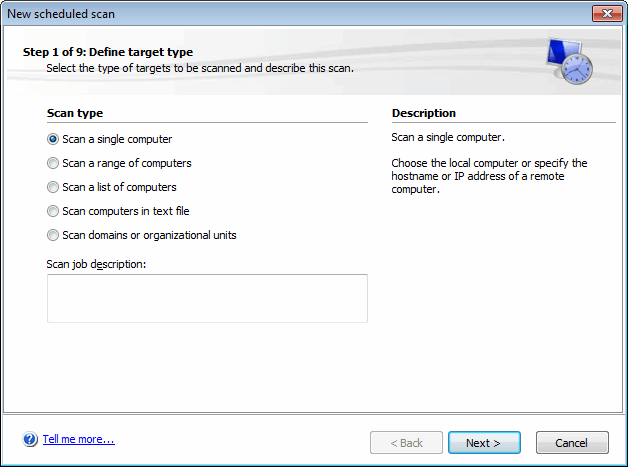
- Choose one of the options described below and click on Next.
Option
Description
Scan a single computer
Scan the local host or one specific computer.
Scan a range of computers
Scan a number of computers defined through an IP range.
Scan a list of computers
Create manually a list of targets, import targets from a file, or select targets from the network list.
Scan computers in text file
Scan targets enumerated in a specific text file.
Scan domains or organizational units
Scan all targets connected to a specified domain/organizational unit.
- Depending on the selected option in the previous step, specify the respective target computer(s) details and click on Next.
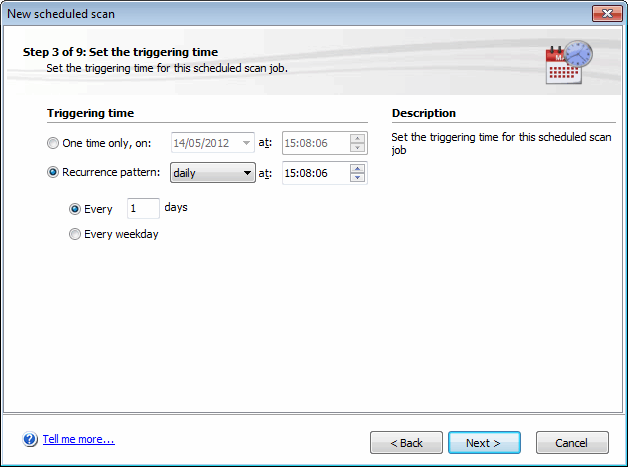
- Specify the date, time, and frequency of the new scheduled scan and click on Next.
-
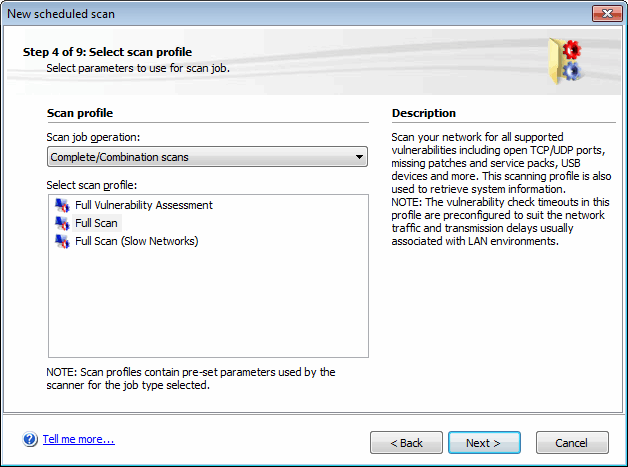
From the Scan job operation drop-down menu, choose the Scanning Profile to be used during the scan and click on Next.
-
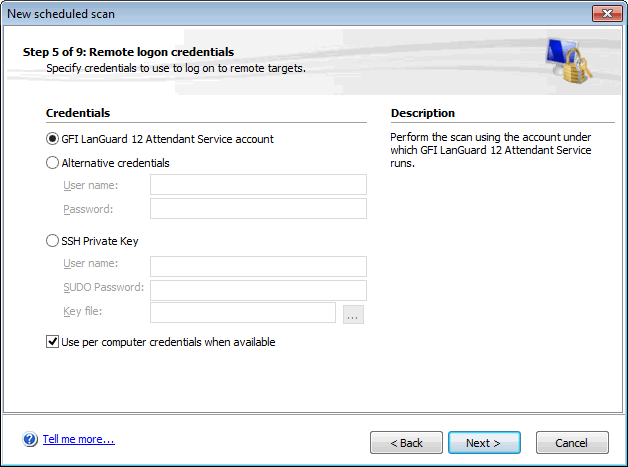
Specify the Remote Logon Credentials and click Next.
Option
Description
GFI LanGuard 12 Attendant Service account
Performs the scan using the credentials specified while installing GFI LanGuard.
Alternative credentials
Specify alternative credentials to connect to the target computers.
SSH Private Key
Enter a username with the respective SUDO password and choose the key file used to log in to UNIX/LINUX/macOS based systems.
Use per computer credentials when available
Use predefined credentials for the scan being configured.
-
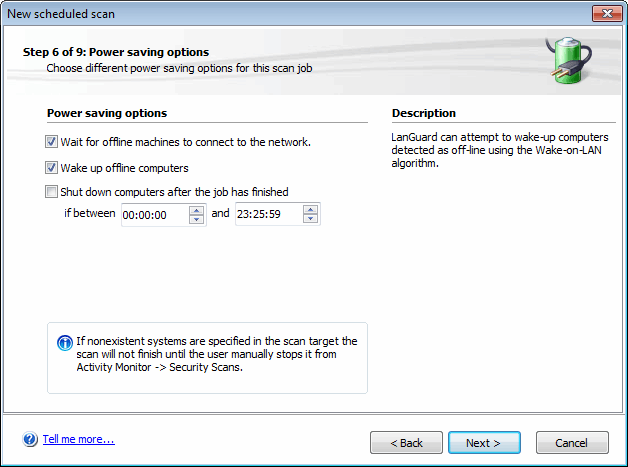
From the Power saving options, choose between the different options:
Option
Description
Wait for offline machines to connect to the network
If this option is selected, GFI LanGuard attempts to wait for offline machines to connect to the network.
Attempt to wake up offline computers
GFI LanGuard attempts to power on offline machines using Wake-on-LAN. For more information refer to Configuring Wake-on-Lan on scan targets.
Shut down computers after the job has finished
After a computer has been scanned or an auto-remediation job has been done, GFI LanGuard attempts to shut down the computer if the time is in the specified timeframe.
Note: If shut down options are defined in Auto-remediation options, the power saving options are ignored.
-
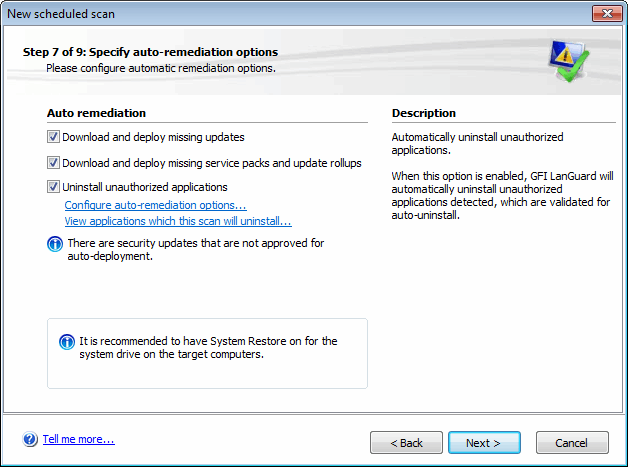
From the auto-remediation dialog, choose the required options and click Next.
Option
Description
Download and deploy missing updates
Automatically download and deploy missing patches on target machines.
Download and deploy missing service packs and update rollups
Automatically download and deploy missing service packs on target machines.
Uninstall unauthorized applications
If this option is selected, all applications validated as unauthorized are uninstalled from the scanned computer (unauthorized applications are defined in Application Inventory).
Configure auto-remediation
Click on the link to configure the options to automatically download and deploy missing patches as well as uninstall unauthorized applications during scheduled operations. For the descriptions of the options, refer to Configuring Auto-Remediation Options.
View applications which this scan will uninstall
Click the link to launch the applications, which will be uninstalled dialog. This will list all the applications that will be uninstalled when the scheduled scan is finished.
-
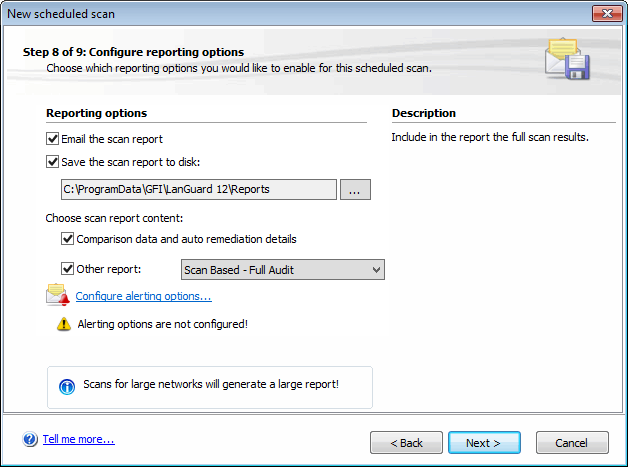
Configure Reporting options:
Option
Description
Email the scan report
Send a report by email at the end of each scheduled scan.
Save the scan report to disk
Save a report to disk at the end of each scheduled scan.
Comparison of data and auto-remediation details
Include details of auto-remediation actions performed and result in comparison with previous security scans.
A comparison is made between scans with the same scan target(s) and scanning profile.
Full scan results data
Include full scan result details.
Configure alerting options
Click Configure alerting options… to specify sender/recipient details.
Override general alerting options, and send email to
(Optional) Send a report by email to a specific email address. GFI LanGuard alerting options are overridden.
-
Review the scan settings summary and click on Finish.
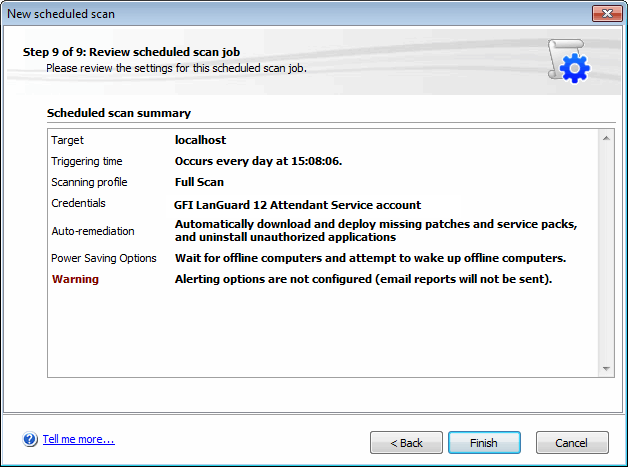
Note: By default, all new scheduled scans are disabled. To enable, click on Configuration > Scheduled Scans and click the 
When a scheduled scan is created, LanGuard updates the configuration XML file toolcfg_schedulescan.xml located at C:\ProgramData\GFI\LanGuard 12\, and the list of computers to the TXT file saved at C:\ProgramData\GFI\LanGuard 12\Cache. Any comments added by users directly to this TXT file will be reported as "Unable to resolve host" errors in the scan during network discovery since LanGuard expects to find and resolve the IP ranges. The scan would still complete for all valid IP ranges found.
Editing a Scheduled Scan Settings
Scan schedules can be reviewed, edited, or deleted from LanGuard console Configuration > Scheduled Scans. All scans are listed on the review page together with the relevant information. Use the scheduled scan toolbar to perform the actions described below:
| Icon |
Action / Description |
 |
Add new scan Display the New Scheduled Scan wizard and create a new Scheduled scan. |
 |
Delete Use this button to delete the selected scheduled scan. |
 |
Properties Review and edit the properties of the selected scan. |
 |
Enable/Disable Toggle the status of the selected scan between enabled and disabled. This enables you to activate/suspend a scanning schedule without deleting the scheduled scan. |
 |
Scan now Trigger the selected scheduled scan. This button overrides the scheduled scan date/time settings and executes an immediate scan. |
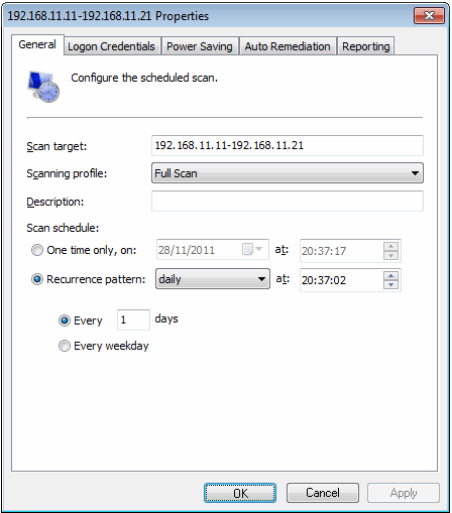
Configuring Scheduled Scan Properties
The scheduled scan properties page enables users to configure all the parameters of the scheduled scans. This can be helpful in cases where you want to customize a Scheduled scan further or apply additional configuration different than the default. To use the scheduled scan properties tab:
- In the LanGuard console navigate to Configuration > Scheduled Scans.
-
Select the scheduled scan and click the Scheduled Scan Properties.
The below table describes the different tabs available in the Properties window of Scheduled scans.
Tab Description
General Make changes to scan target setting, type of Scanning Profile, and scan frequency.
Logon Credentials Specify logon credentials used when scanning the specified target.
Power Saving Configure power saving options. This enables you to configure the scan to wait for offline machines to connect to the network, attempt to wake up offline machines, and shutdown machines when the scan is completed.
Auto Remediation Configure the remediation options applicable to the scan being configured. This includes downloading and installing missing patches and service packs, as well as unauthorized software uninstallation.
Reporting Configure reporting options used for the selected scheduled scan.
-
Click OK.
Testing
Confirm that the new/updated scheduled scans are successfully set by clicking on Configuration tab > Scheduled Scans. Running or completed scans would be available from the Activity Monitor tab > Security Scans.

Priyanka Bhotika
Comments