- I strongly recommend creating a full system snapshot/virtual machine checkpoint before proceeding.
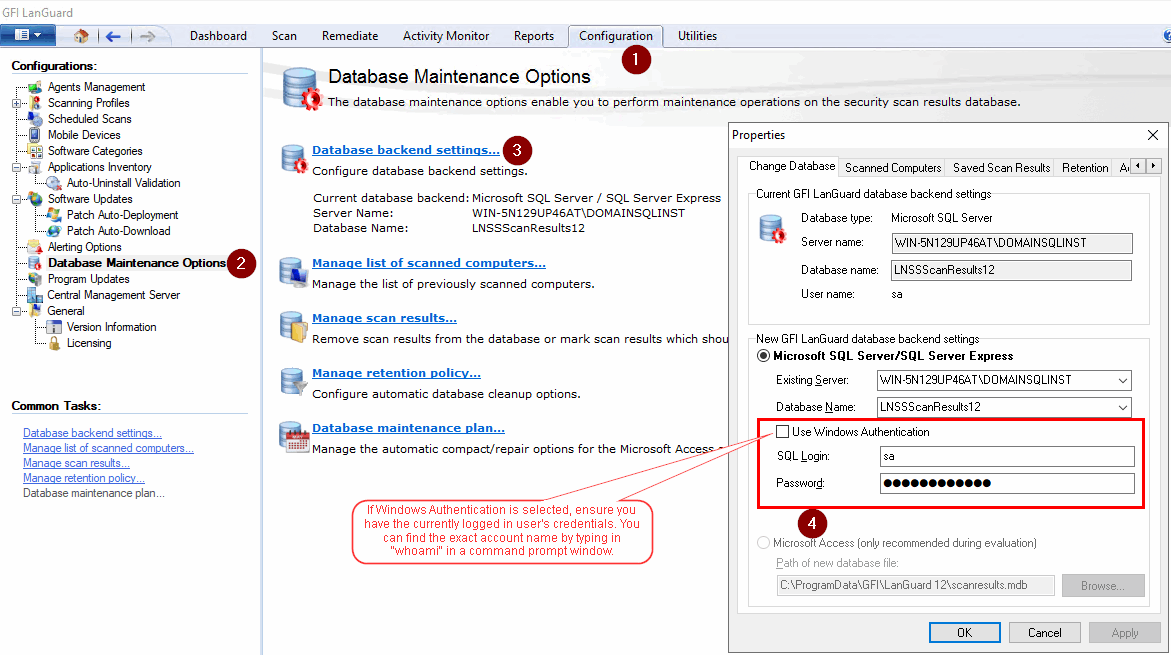
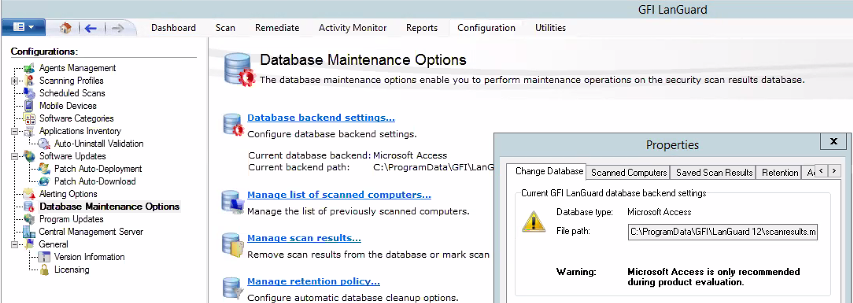
- Ensure you have access to the service account credentials, the license key, and the SQL backend login specified in LanGuard. See the image below to understand how to check the SQL account used in LanGuard.
- Ensure you are using the latest version. You can download the setups via the GFI Upgrade Center. The download page will ask you to download a trial version; this is fine. The setup remains the same for trial and full versions.
-
Copy the following to a secure location:
- C:\Program Files (x86)\GFI\Languard 12 Agent\crmiini.xml – this stores the current Installation ID used for backend checks in communicating with agents.
- C:\ProgramData\GFI\LanGuard 12\lnss.dta – this encrypted file stores the credentials specified in LanGuard.
- C:\ProgramData\GFI\LanGuard 12\Cache – this folder may contain custom text files used in Scheduled scans. It also contains the latest active directory structure that LanGuard found by querying the domain controllers.
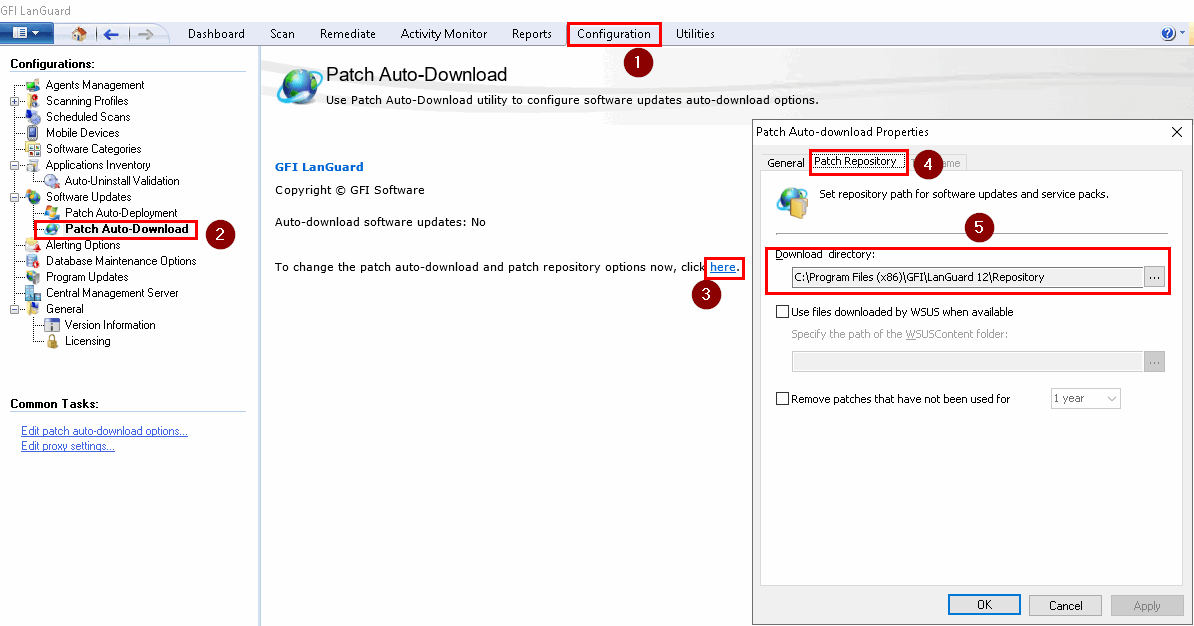
- The patch repository, if it is in the default location of C:\Program Files (x86)\GFI\LanGuard 12\Repository. You can confirm this by navigating to Configuration > Patch Auto-Download > click here link > Patch Repository tab as shown in the image below.
-
Back-Up LanGuard by:
- Creating a Full Database Backup – You can check the server/database being used as shown in the Server Name/Database Name fields in the first screenshot.
-
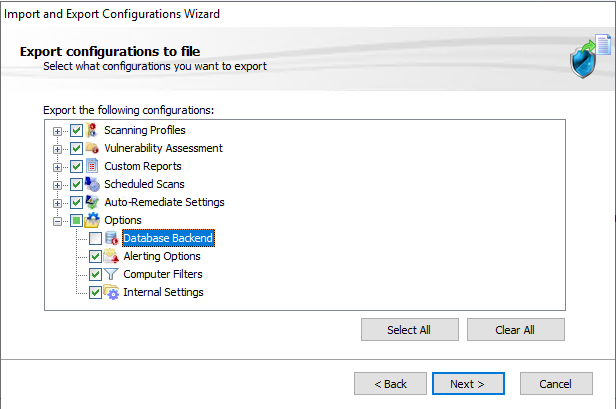
Follow the Importing and Exporting GFI LanGuard Settings article, but DO NOT export the database backend. If unchecking Database Backend disables Scheduled Reports too, then export the settings with Database Backend enabled, but DO NOT import the Database Backend in step 15 of this guide.
- Close the LanGuard console (if open) and uninstall LanGuard from Control Panel > Add and Remove Programs. Acknowledge the warning about existing agents (if it pops up) and proceed.
-
Ensure that the following folders below do not exist before proceeding – the deletion may take up to 15 minutes after LanGuard is removed from the Control Panel > Add and Remove Programs list. If you see the folders below even after 15 minutes post uninstallation, please follow the Removing GFI LanGuard Manually via the Registry article to clear all leftover data. The deleted folders should be:
- C:\Program Files (x86)\GFI\LanGuard 12
- C:\Program Files (x86)\GFI\LanGuard 12 Agent
- C:\ProgramData\GFI\LanGuard 12
- Restart the machine.
-
Install GFI LanGuard. Ensure that any antivirus software is completely disabled during the installation; this includes Windows Defender. If the setup does not launch after you select the language, uninstall the Central Management Server and try again. Connect to the existing SQL backend as noted in step 2 of this guide. If you get the SQL Database Name error, see this note. Follow the Best Practices for Setting up Account Permissions with Alternative Credentials in LanGuard when choosing the service account. DO NOT launch LanGuard yet; uncheck the option to launch LanGuard at the end of the setup.
-
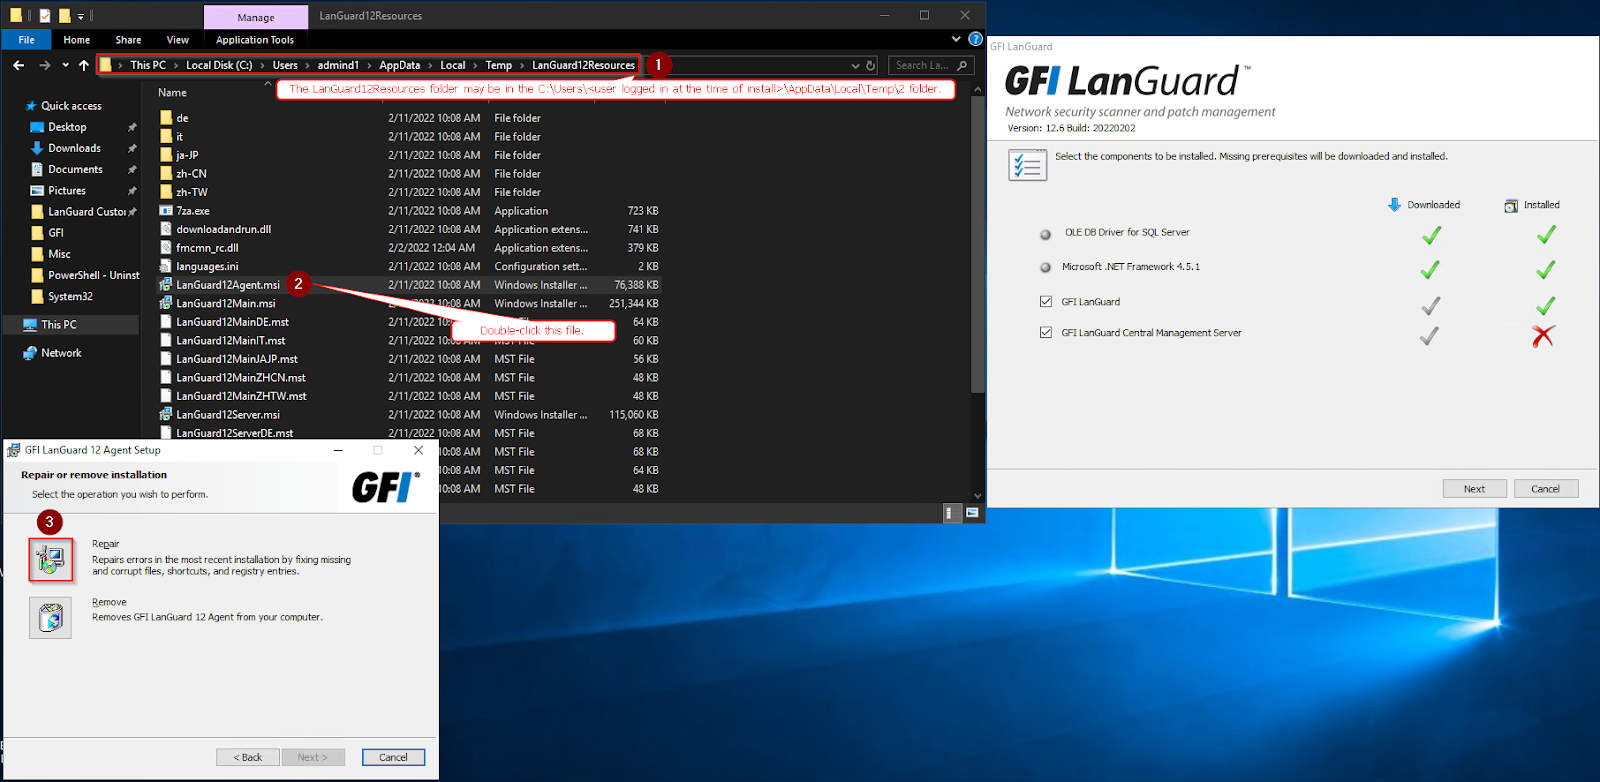
Check whether the C:\Program Files (x86)\GFI\LanGuard 12 Agent folder is present. If yes, proceed to the next step. This is the LanGuard scanning engine, A.K.A. the LanGuard Agent, and is installed in this directory regardless of what location you specify for the main app to be installed in. If this folder is completely missing, the installation was corrupted. Please double-check your antivirus status, it should be off – completely disabled. Then, follow the Solution section of the Fixing GFI LanGuard Broken Installation or Failed Upgrade article until step 7 and then follow the screenshot below to repair the agent:
If there is an error stating that “this action is only valid for installed products,” double-click the LanGuard12Agent.msi file to install the agent from scratch.
If none of these methods helped, start again from step 7 in this guide. Only proceed if the C:\Program Files (x86)\GFI\LanGuard 12 Agent folder is present.
- Copy the files and folders backed up in step 4 of this guide to the original locations. You may be asked to replace existing files; do so.
- Set LNSSCommunicator to Launching User. If the Attendant service is missing, follow the video in the next step.
-
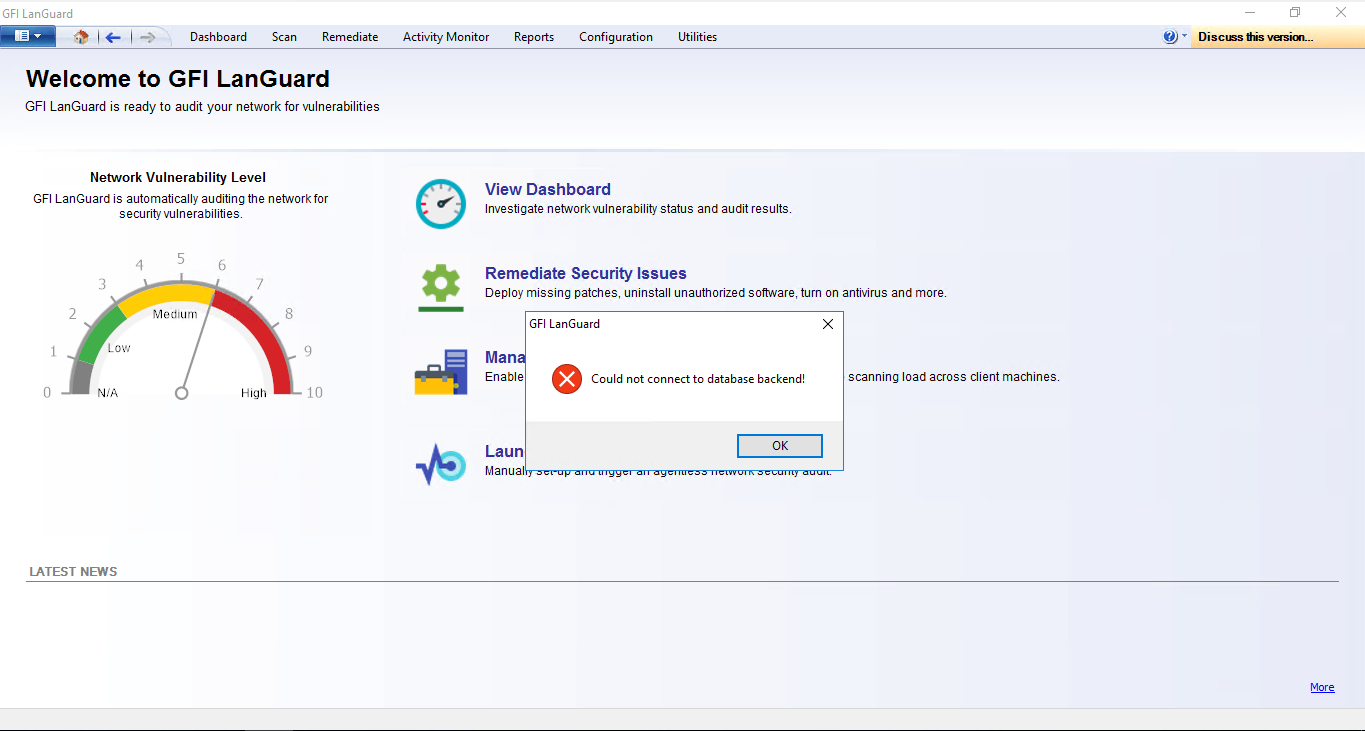
Launch LanGuard. You may have to follow this video after launch if you had to repair the agent in step 10: Video – Attendant Service Is Not Registered. If you run into the message shown in the screenshot below (LanGuard uses an Access database instead of SQL), simply specify your SQL credentials and database instance again, then click OK and Yes to change the database instance.
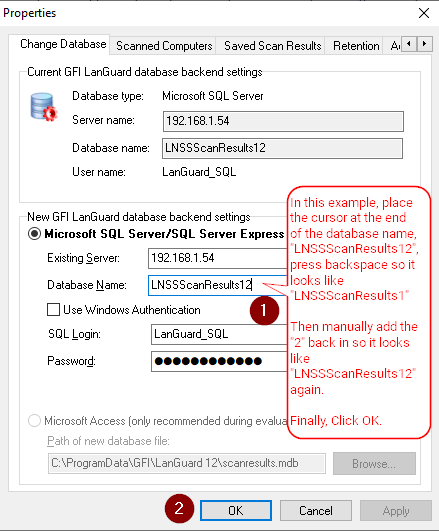
- This step is only if you run into the “Could not connect to database backend” error; if not, go directly to step 15. Click OK and you will be taken to the Configuration > Database maintenance options screen. Click OK again.
In the window that opens after clicking OK, delete the last character of the database name and then manually add it back. Then click OK as shown below.
You will be asked to confirm the database change; click Yes and let the process complete. It might take quite a while. After it is done, you will be informed that LanGuard will automatically restart to apply the changes. Click OK and let it re-launch. - Import the configuration backed up in step 5 of the guide as per the Importing and Exporting GFI LanGuard Settings article. If you are asked to override profiles, do not do so unless you have modified the default profiles. Even then, I would recommend Creating and Personalizing a New Scanning Profile instead, because the default profiles are useful for troubleshooting.
-
This step is only applicable if you have workgroup machines, otherwise, skip to the next step. You may note that if there are any workgroup machines, the Agent status could be shown as Agent Pending Installation – Access is Denied. You will need to manually retry the agent installation in this case. It will detect the existing agent as installed in around 5 to 10 minutes. This can easily be done manually for a handful of machines. However, it gets tedious for 50 or 100 workgroup machines. For this purpose, I made a script that you can use as follows:
- Download the Redeploy Agent Script.
- Copy it to the LanGuard server > Right-click it > Run as administrator.
- Select the first workgroup machine and read the remaining instructions before step 12 carefully before proceeding.
- Press Ctrl+d (d = deploy, to help remember the command). DO NOT move the mouse or press any key while the script is running.
- Note that the script will redeploy the agent and move on to the next machine down the list.
- Press and hold the "s" key to halt the script at any time (s = stop deploying, again, to help remember). Release the key once you confirm that the script is no longer performing automated actions. I recommend pressing and holding “s” right as the script reaches the last machine. Install the last agent manually.
- Exit the script from the taskbar.
- Check out the animated GIF below to see the script in action.
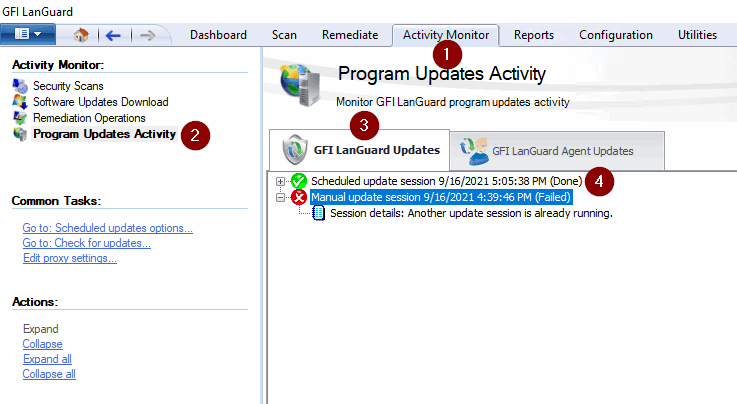
- When LanGuard is installed, it downloads Program Updates in the background. This includes patch and vulnerability definitions among other critical components. This means LanGuard may not be ready to scan targets yet. To check when LanGuard is ready for scanning, confirm that the scheduled update session succeeded by navigating to Activity Monitor > Program Updates Activity > GFI LanGuard Updates as shown below.
The background update may take up to an hour to finish, so be patient. You may also see the highlighted failed manual update session. This is OK. - If you notice failures with the scheduled updates (A red X sign or a Yellow ! sign), Update the LanGuard Server Manually. If the errors persist, open a new LanGuard support ticket and provide any screenshots and error messages that may help us diagnose the issue quickly.
- Finally, be sure to install the x86 version of the VC Redistributable package as per the Ensuring that the required DLL module is installed section of the Resolving the LanGuard Error 'Communication server is not running' article.
Once the Program Updates are done, LanGuard is ready for scanning. You can now run manual and agent scans to update the patching and vulnerability status for the machines in the LanGuard computer tree.
Note about the SQL Database Name error
If LanGuard is installed on Windows Server 2016/2012 R2, note that the way LanGuard connects to the database initially has changed in v12.6 and newer builds. Please use IISCrypto and ensure that you have at least the settings in the screenshot below checked on the LanGuard host. Other settings may be enabled alongside these, but at least these must be checked:
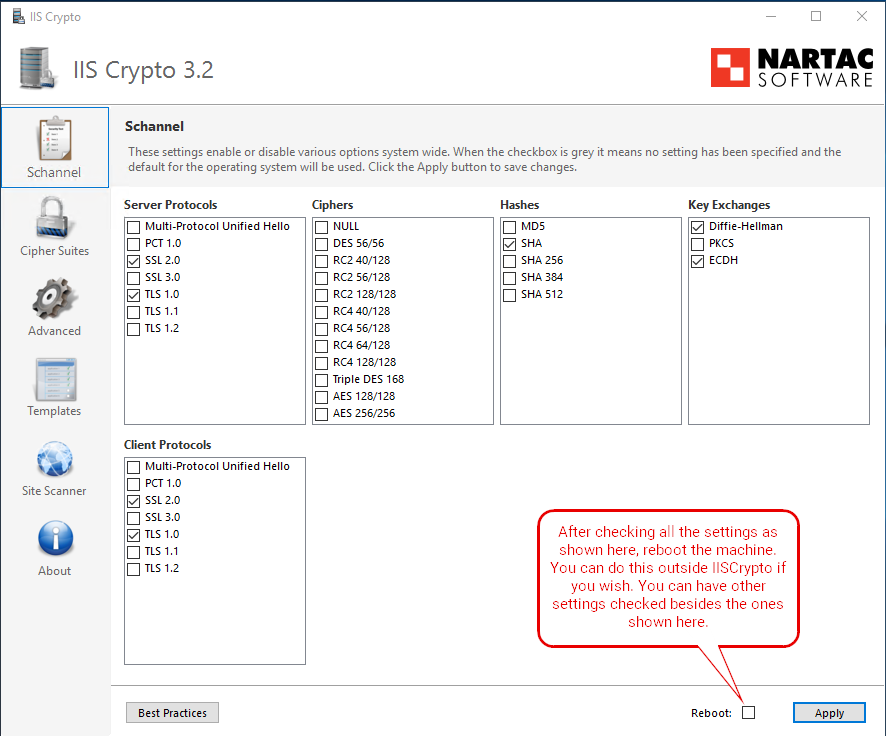
If you had to check any of the settings above, reboot before upgrading/installing. Failure to have these checkboxes enabled will cause the "SQL Database Name" error when trying to connect to the existing SQL backend.
If the issue persists, and the LanGuard database is located on another machine, apply the same settings to that machine as well. Reboot it.
You can revert the changes after the upgrade/installation is complete, and you have ensured that you can run a scan via the Scan tab (doesn’t matter if it fails, as long as it completes).
These changes need to be made before each upgrade to builds after v12.6. The permanent fix is to move your LanGuard and SQL installations to a modern Server OS like 2019/2022 where you do not need to apply these changes.
- Migrating GFI LanGuard to a New Server
- Moving the Microsoft SQL Server Databases by Using Detach and Attach Functions
SQL operations are outside the LanGuard Support scope. These are expected to be performed by a database administrator.
Priyanka Bhotika
Comments